In between running around like a headless chicken and trying to maintain a ‘healthy’ work/job/life balance, I’ve finally finished up my final project of the year ♥
It was quite an arduous process, but I think I actually really benefited from the super short time frame I’d been left with- not only was I working towards my deadline, I was also racing to get my art book submitted for publishing in time! I wanted this piece to be included, so that was another self imposed time limitation.
I created the piece on Procreate, using a variety of my own photos from my 2018 China trip to inform the architecture and layout. I clocked in just over 30 hours across 4 days according to the app, so here’s a wee time lapse video of my process to make a very long story short! (This is the 30 second quick cut- the longer time lapse video is about 12 mins long, and unfortunately I couldn’t quite get it to load up on Vimeo!)
So it was quite a linear, reassured workflow, but also had some new techniques being used since Procreate is a completely new tool to me since my last Cheltenham project in 2017. I’m really pleased with how far I’ve come, as my line art, layers and detailing/texture management has come leaps and bounds. While I still appreciate the flat, pastel-y appeal of my old Cheltenham piece, this newer one boasts a lot more depth, as well as a more experimental colour palette that really is quite ‘far out’ for me as an artist- up until now I really have been stuck in my ways with pastels and monotone, but the subject matter fully supported a warm, deep toned palette and I think it ties in quite well.
Here’s the finished piece- there’s loads wrong with it of course, but I’m content for now ♥
Modernisation (Collingwood, 2019)
Although I feel I’ve had a lot of success with this project, there were still some weak areas here and there- artwork wise, I think there’s still something amiss with the anatomy… but I have the time to fix this before final show, where I’ll hopefully be exhibiting this art as a centrepiece. If I’d have an ample amount of time prior to hand in this could have been fixed, but my workflow left me with a bit of a difficult situation- the way in which I’d blended the layers and applied tone and shading meant the line art and skin tones were across multiple layers, so it won’t be an easy task to correct this.
Working on this Cheltenham project has opened up lots more opportunities for me- I’m considering making a series of similar pieces based on my travels around the world. Also, when I submit this piece to the Awards I could potentially be featured in a catalogue showcasing selected entries from the year. Very exciting~
And with that, this wraps up my project work for Semester 2! Left to do is to finish off this blog, as well as some promo type stuff, like business cards, a creative CV and other artist-specific things like potential merchandise for final show. So, targets for the following week include tying up all the loose ends and making sure everything is ready and prepped for hand in, and also starting to think about final show- what I want to exhibit, sources for merchandise, and technicalities like layouts, exhibit space organisation, and marketing.
Back with another post on our day out at the Durham University Botanic Garden and Oriental Museum! Find my post on the Botanic Gardens here c:
Admittedly, I’m really not much of a museum-goer… I find them quite dry and stuffy at the best of times. However, I do have a deep appreciation of Asian culture and art, so I thought I’d give this museum a go since it sounds right up my street. The uni were also running a special admission deal for the Botanic Garden and the Oriental Museum on the same day~
Upon arriving the museum was nicely set out, organised in a tiered open space type layout- I know this has nothing to do with my research but it made it feel nice and airy in there (which made me much less anxious about spending hours getting lost in a blur of similar exhibits)!
Durham University Oriental Museum: Main Floor (Collingwood, 2019)
There were a plethora of cultures on show at the museum including Korean, Egyptian, Middle-Eastern and Indian exhibits which I thoroughly enjoyed; however, for the purpose of this post I’ll be looking specifically at Chinese and Japanese items, since that’s what I’m basing my project on.
We visited the Japanese exhibit first- although it was small, there were some gorgeous examples of early ceramics and pottery, as well as some ceremonial prayer set-ups and symbolic items. My favourite exhibit was the collection of traditional Hina Matsuri dolls. The attendant told me these are only displayed for a short time around Doll’s Day or Girl’s Day (celebrated on the 3rd March each year)- more on this holiday here if you’re curious!
Durham University Oriental Museum: Hina Matsuri Doll Display (Collingwood, 2019)
This is exactly what I was looking for to supplement the images of flora and fauna I’d taken in the gardens… I’m excited to work some of these visual styles into my concepts c:
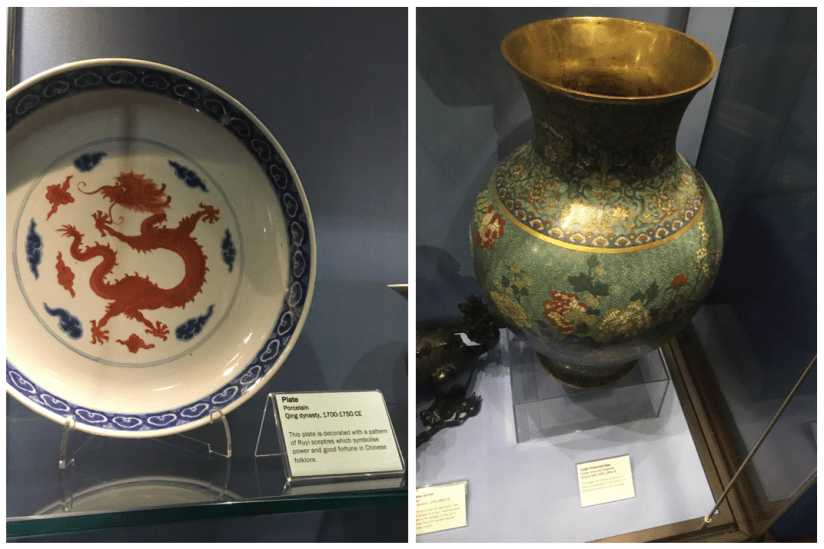
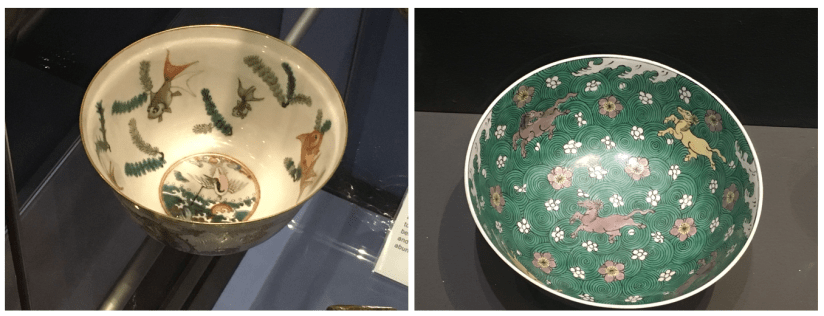
I then wandered across to the Chinese exhibit floors- there was a much larger space for Chinese items and artwork, so I was able to gather tons of really useful reference imagery. The ceramics and pottery were standouts for me; peek a few photos from the exhibit below. My favourite item was the huge Qing Dynasty cloisonné floral vase!
Durham University Oriental Museum: Qing Dynasty Red Dragon Plate/ Qing Dynasty Cloisonné Vase (Collingwood, 2019)Durham University Oriental Museum: Qing Dynasty Porcelain Bowl with Fish and Crane/Floral Horse Bowl (Collingwood, 2019)
At the far end of the Chinese floor was a huge paper replica of a traditional Chinese Dragon- with Chinese New Year being recently, it was nice to see an example of some more modern festive items. In particular I was happy to see this, since my current concepts for the Chinese risograph feature a traditional Chinese Dragon very prominently.
Durham University Oriental Museum: Upper Floor Chinese Dragon and Lanterns (Collingwood, 2019)
You may have noticed the quality of these photos is lacking in this post… truthfully I find museums to have horrendous lighting for photographing exhibits, so while most of my pics are useful and do the job, they’re not very nicely composed and a bit naff. There was also no flash photography, so I just had to make do with the conditions in there… and it was very dark >:c
Overall I thoroughly enjoyed my research visit to Durham. I’m so pleased I was able to source places to go for references for this project- I doubted I’d be able to find sufficient primary sources, so I was winning before I’d even begun~
I’m looking forward to working this new imagery into my concepts- I feel much more equipped to produce some lovely symbolic pieces of art that work well together and show my appreciation for the beauty of Asian culture ♥
References
Collingwood, C. (2019). Durham University Oriental Museum: Floral Horse Bowl[photograph].
Collingwood, C. (2019). Durham University Oriental Museum: Hina Matsuri Doll Display [photograph].
Collingwood, C. (2019). Durham University Oriental Museum: Main Floor[photograph].
Collingwood, C. (2019). Durham University Oriental Museum: Qing Dynasty Cloisonné Vase[photograph].
Collingwood, C. (2019). Durham University Oriental Museum: Qing Dynasty Porcelain Bowl with Fish and Crane[photograph].
Collingwood, C. (2019). Durham University Oriental Museum: Qing Dynasty Red Dragon Plate[photograph].
Collingwood, C. (2019). Durham University Oriental Museum: Upper Floor Chinese Dragon and Lanterns [photograph].
Wikipedia (n.d.). Wiki – Hina Matsuri [online]/ Available at: https://en.wikipedia.org/wiki/Hinamatsuri [Accessed 24 Feb 2019]
The post I published a little while ago about alternate embellishment techniques really got me back into one of my favourite varieties… washi tape collage. It’s fast become one of the most relaxing ways to work on a piece, and I love doing washi collage when I’m feeling particularly stressed or anxious.
I first discovered this technique when I stumbled across the work of @shardula (real name May Ann Licudine) on instagram. Her art is so delicate and lovely!
Washi means ‘paper’ in Japanese, so washi tape literally means paper tape. To be honest it’s basically fancy masking tape, but the quality is mostly above and beyond what you’d usually find. It’s a joy to work with since it’s strong, versatile and comes in every pattern imaginable, allowing for a wide variety of uses.
In the style of my childhood hero Neil from Art Attack, “here’s one I made earlier”:
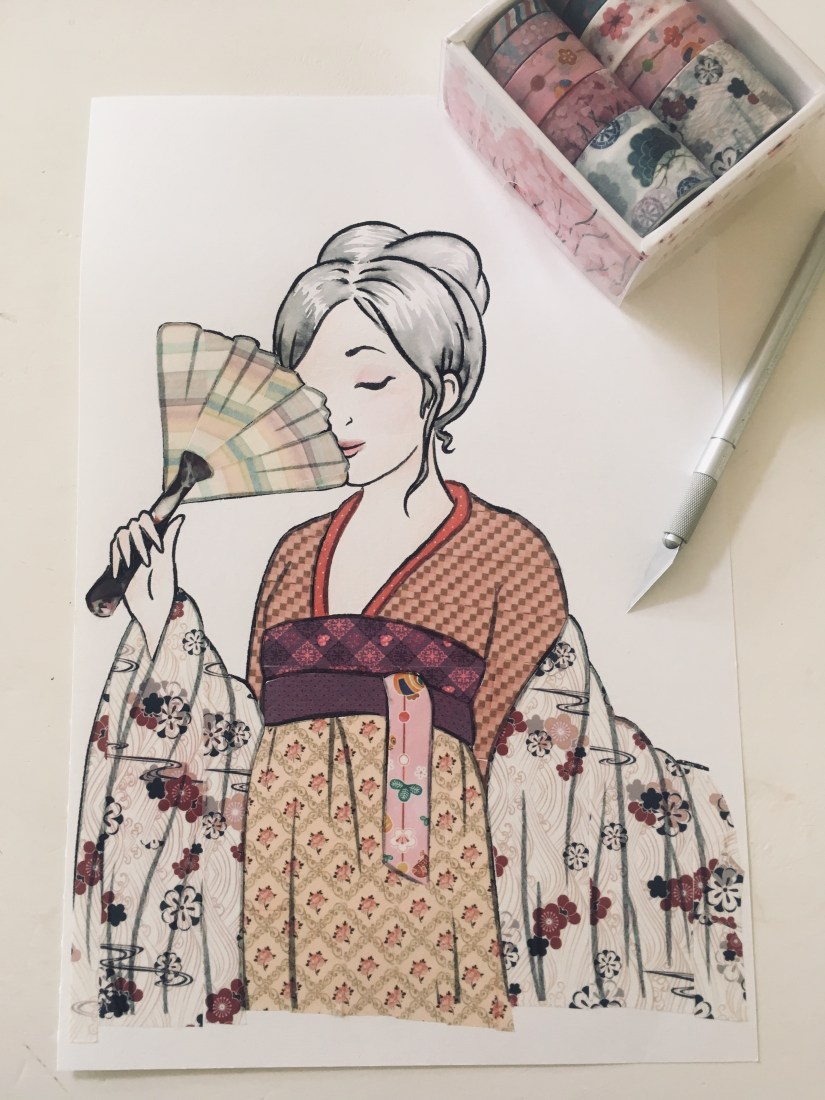
Maiko Washi Tape Collage (Collingwood, 2018)
As you can see, the semi-opaque quality of washi tape makes it really easy to work with. As the line art can be seen through the tape, this helps to prevent the artwork from looking too loose, while also adding more detail and letting the accuracy of your actual collage be a little more lenient.
So, onto the ‘how to’! ❀
You’ll need:
An image to work with– try using a simple line art image for the best results. Use good card stock to minimise accidental cuts on the paper when collaging~
A selection of washi tapes (good quality so they adhere to the paper and don’t lift at the edges)
A sharp scalpel or craft knife– mine has a thin pointed blade for the best precision when cutting fiddly bits!
Watercolours or another medium to add final details to the image (optional)
I’m starting off with a plain line art image- this can be anything but I’m sticking with a similar type of concept as my example, as it has lots of potential for patterned collage.
Select a tape that you’d like to use- I find solid repeat patterns are the best to use, with photographic themed tapes (e.g. characters, food, animals) being a bit less favourable for this application.
I usually work on the largest area first. Depending on how wide your tape is, you can cover a whole section with one piece, or you might need to lay strips side by side. If the pattern allows you can try to match up the pattern to create a seamless design, but honestly I think the organic nature of the workflow shines through if the tapes are slightly misaligned c:
Temporarily press the tape into place while it’s still attached to the roll, then use your scalpel to lightly cut around the edge of the area, leaving a clean cut where the pattern ends and preserving as much washi as possible (this stuff can be pricey!)
Because good washi tape won’t damage the paper, you can reposition this as many times as you need to. A wee dab of glue will fix any curling edges when a piece has been repositioned one too many times ^^” I use the edge of my scalpel handle to firmly press the washi down when I’m happy with how it looks.
If the tape is light in colour and translucent enough, you should be able to see the line art through the tape when working, which is really useful as it makes it much easier to see what you’re doing. If the tape is dark or too opaque you can still use these techniques, it just takes a little bit more guesswork… try chipping away at an edge to maintain a precise cut rather than winging it on the first go~
Washi Tape Collage Tutorial: Translucent Line Art Detail (Collingwood, 2019)
If you have a roll of tape that has lots of bold large scale pattern, you can also cut out individual elements to add to the image as stand alone embellishment. For example, this really wide roll I have features lots of leafy, flowery type things that can be easily cut out, due to their solid edges and distinct shapes. Even if the pattern runs off the edge of the tape, you can just fashion your own leaf or petal edge out of the existing imagery.
Use every pattern to your advantage- tapes can be applied sideways to follow the shape of the image, or used sparingly to embellish a tiny portion of the piece!
Washi Tape Collage Tutorial: Small Detailing (Collingwood, 2019)
To finish off, you can hand embellish the remaining bits of the image with watercolour, ink pen or whatever you fancy using. I like to fill in areas that wouldn’t have worked well with washi, e.g. hair, skin, and other textures that weren’t represented within my tape collection.
And there you have it- your own little washi collage. Not thrilled about the tapes I used for this image, but at the time of writing I was waiting on a new stash to arrive ^^”
Hope you enjoyed this tutorial! I’ve also compiled a list of tips and tricks, as well as some of the best sources for nice washi ❀
Tips and Tricks~
– Using a super sharp knife (as is needed) might result in you accidentally cutting through the paper… I do this literally all the time. Most cuts will be so crisp that you can simply push the paper back together, effectively ‘sealing’ the cut closed. Add a little bit of very strong tape (e.g. heavy duty masking tape or clear sellotape) to the reverse of the image if you want to stop the cut from lifting open again. c:
– Always use this technique on a separate piece of paper, rather than in a sketchbook where there’ll be other imagery on the reverse of the sheet. You can always insert any finished washi collage into a sketchbook after you’ve finished~
– Tapes come in loads of widths, from really thin to over 2 inches wide! Use this to your advantage to preserve tape and fill in tiny details ♥ You can also purchase special ‘writeable’ washi tape, where the surface is less waxy, allowing for detail to be added over the top of any collage work.
– Don’t know which washi to use? Keep a swatch book with examples of all your tapes- that way, you’ll know how big/long the repeat is, what direction the repeat runs in and exactly which elements are on each roll. Here’s a page from my swatch book:
Washi Tape Swatch Book (Collingwood, 2019)
Where to Buy~
Washi is available in an infinite amount of patterns and styles- I’ve collected washi for a long time! Some of the best sources are:
Paperchase– the seasonal tape collections often go on sale, so watch out for any upcoming discounts. A bit hit and miss at times, but every so often I find a real gem in here! Most of the tapes are a bit Basic though haha
Michaels (US-based craft store)- they sell huge bumper packs of washi in tons of themes and often run ‘50% off one item’ coupons.
Fox and Star– loooove this store, but they’re a bit on the Super Duper Expensive side. Single washi rolls are always priced at a premium compared to multipacks, but it’s UK based to save on postage, at least~
MiSoPaper– this online store has lots of tapes that fit my personal tastes. Slightly limited in certain categories, but can be quite affordable and there’s free delivery over £15 c:
If you’re feeling brave, try AliExpress– like all of the above, but a tenth of the price but takes 2+ months to arrive. You will find every single variation of ‘weird and wonderful’ on Ali! c:
Above all of these sources, nothing brings more joy than finding a one-off store that’s washi heaven. All of my favourite tapes are from a stationery store I stumbled upon during my trip to Shanghai- it really had it all. Rolls were 7 yuan (80p) a piece; the multipacks even better value! My fave find was a beautiful little box of Sakura washi:
‘Sakura Dream’ Washi Box (Collingwood, 2019)
And that’s a wrap! Sorry this was a long’un- thanks for reading! I hope this is helpful ♥♥♥
References
AliExpress (2019). AliExpress – Smarter Shopping, Better Living! [online]. Available at: https://www.aliexpress.com [Accessed 28 Jan 2019].
Collingwood, C. (2018). ‘Maiko’ Washi Tape Collage [ink, washi tape].
Collingwood, C. (2019). ‘Sakura Dream’ Washi Tape Box [photograph].
Collingwood, C. (2019). Washi Tape Collage Tutorial: Cutting Washi [photograph].
Collingwood, C. (2019). Washi Tape Collage Tutorial: Materials [photograph].
Collingwood, C. (2019). Washi Tape Collage Tutorial: Small Detailing [photograph].
Collingwood, C. (2019). Washi Tape Collage Tutorial: Translucent Line Art Detail [photograph].
Collingwood, C. (2019). Washi Tape Swatch Book [photograph].
Fox and Star UK. (n.d.). Fox and Star UK – Cute stationery suppliers [online]. Available at: https://www.thefoxandstar.co.uk [Accessed 28 Jan 2019].
Fox and Star UK. (n.d.). Fox and Star UK – MT ex Bird Egg Washi Tape [online]. Available at: https://www.thefoxandstar.co.uk [Accessed 28 Jan 2019].
Licudine, May Ann. (n.d.). Mall Licudine (@shardula) – Instagram photos and videos. [online] Available at: https://www.instagram.com/shardula/ [Accessed 28 Jan 2019].
Michaels. (n.d.). Michaels Stores – Art Supplies [online]. Available at: https://www.michaels.com [Accessed 28 Jan 2019].
MiSoPaper. (n.d.). MiSoPaper – Home [online]. Available at: https://misopaper.co.uk [Accessed 28 Jan 2019].