portfolio

Risograph Realisation- Printing and Embellishment

First of all, sorry for the super long hiatus- between the Easter hols and life stuff in general, I’ve been busy sorting out various aspects of this project- it’s been a journey, but we made it!

In terms of finalising the imagery for print production, I had a few issues with the Dragon image- when I’d first decided on the central elements of each print, I was acutely aware that if I didn’t execute it properly the Dragon image would be a bit… cheesy looking. Maybe it’s just my spin on things, but dragons are inherently a bit lame so I really had to work to make sure my print wasn’t typical/lame. I feel like it’s halfway in-between haha- not quite cringey, but also not really what I envisioned, which is a bit of a shame. I based the imagery off a decorative wall within the traditional Yuyuan Garden in Shanghai:

yu-garden-768(2)
‘Dragon Crossing the Clouds’ (China Discovery, n.d.)


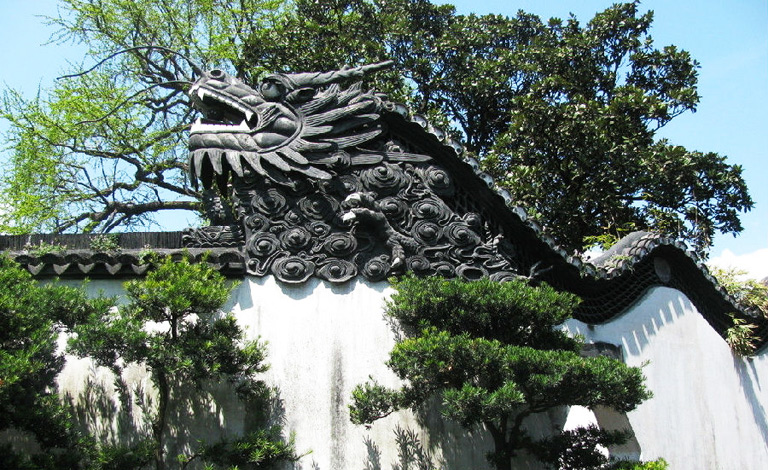
I thought this was a really unique part of the architecture within the garden, and this helped me immensely while I was designing this part of the imagery ❀

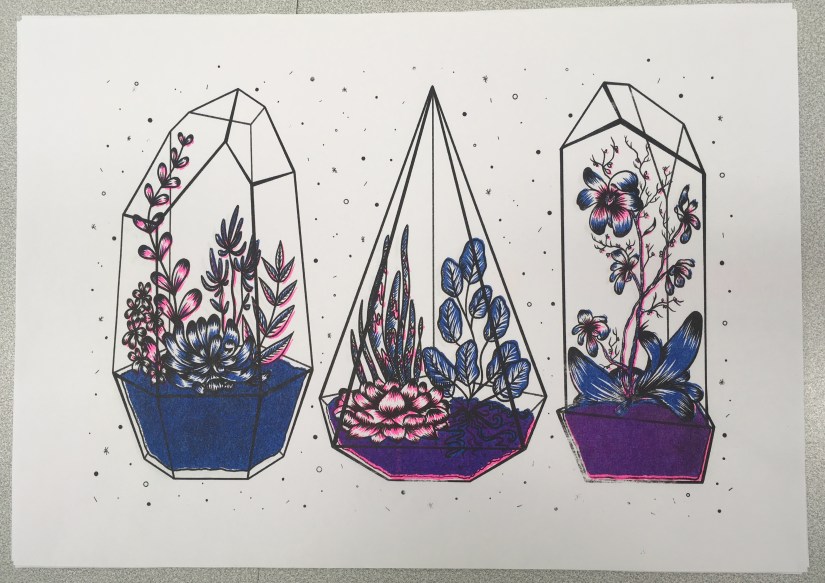
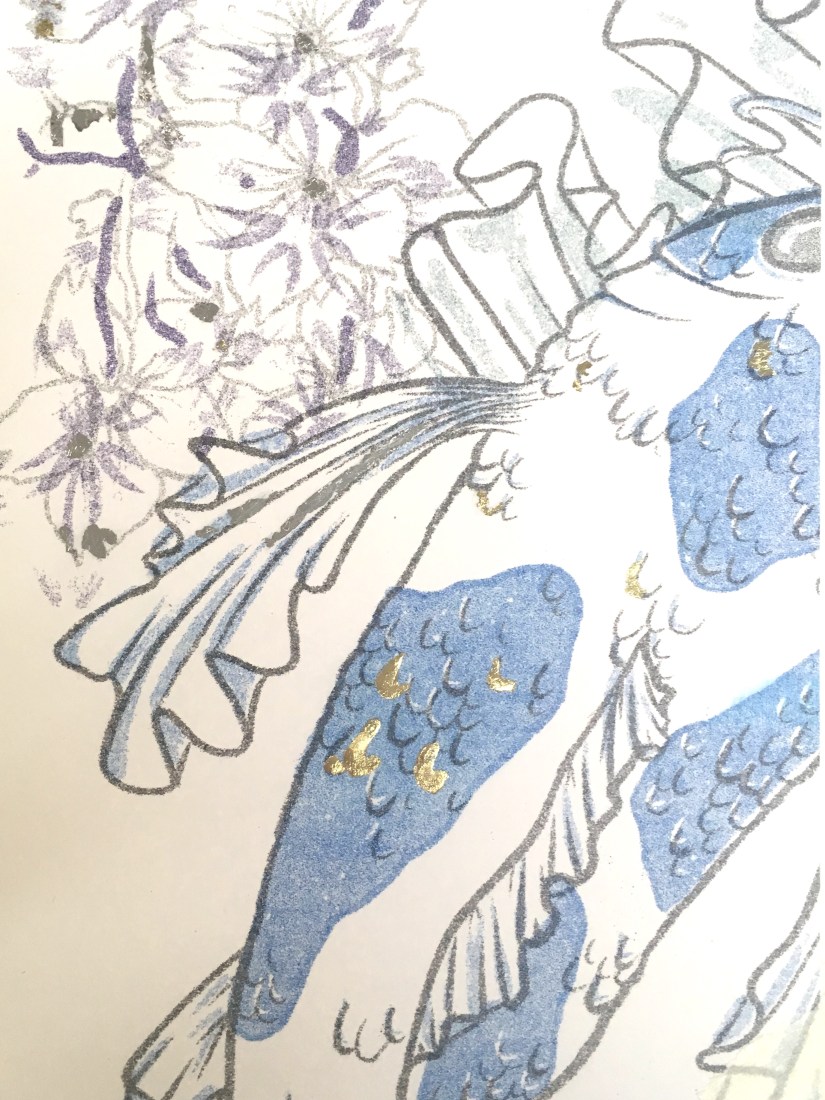
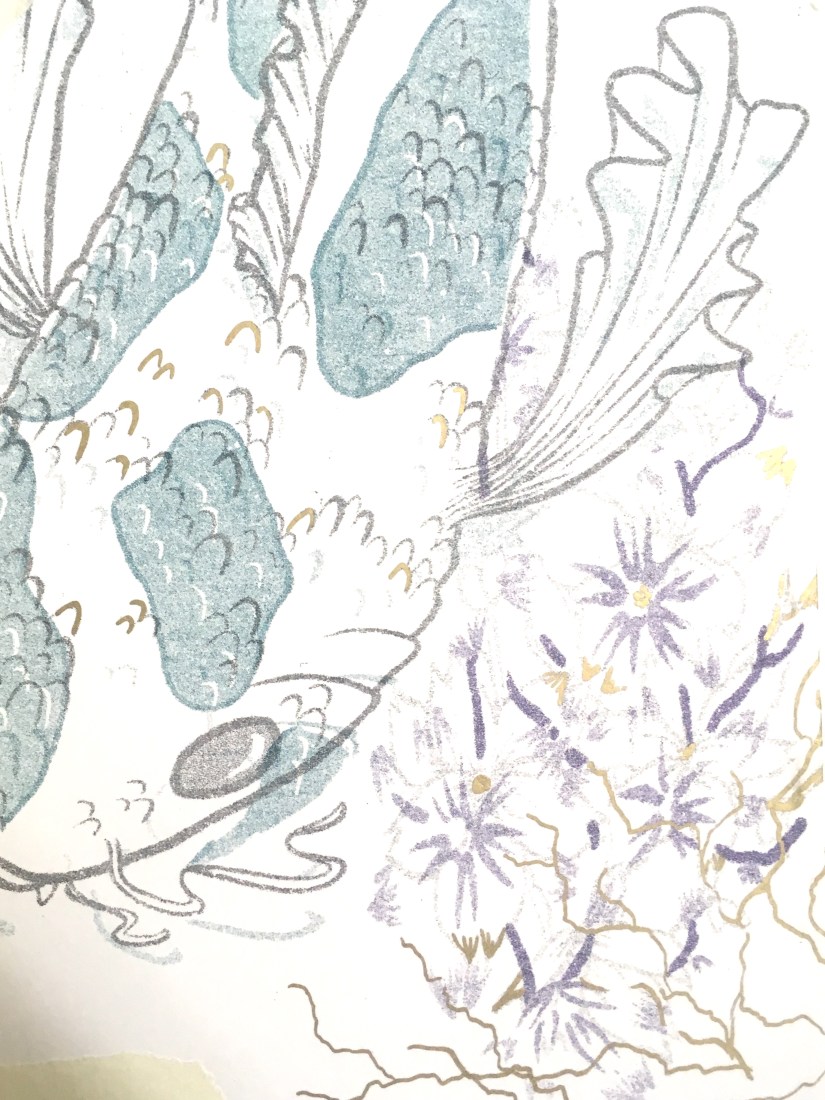
The koi, as previously noted in my Durham University visit posts (here and here), was influenced by reference imagery taken during my outing. This was the easier of the two prints to design, as the subject matter lends itself towards the type of aesthetic I was going for~


I won’t document the actual printing process here (more info in my research folder) as that’s already been covered on this blog here, but my final two designs turned out much nicer than expected! The new ink colours really helped too, as I was able to use a much cooler, less harsh palette of blue, teal and purple. I really knocked down the opacities on all four layers, which produced a lovely painterly effect…

…in fact, the resulting imagery was so nicely processed that I didn’t even want to embellish on top of these! I did some tests with metallic inks, pens and foil leaf on a failed print from my first printing attempt, and honestly the results were nice, but didn’t enhance the prints at all. The embellishment appeared very heavy compared to the plain prints, so I decided to ultimately leave this part of my proposed process out, since I felt it detracted from the final product too much. That’s not to say I regret researching into this so much- I can undoubtedly use these techniques in the near future, as I plan to work with printmaking often once I graduate.

IMG_9864
Risograph Embellishment: Gold Leaf Test (Collingwood, 2019)
IMG_9865
Risograph Embellishment: Metallic Ink Test (Collingwood, 2019)
IMG_9866
Risograph Embellishment: Metallic Pen Test (Collingwood, 2019)

Targets for the coming weeks include… doing the entire Cheltenham Awards project because I’ve left it so late! As well as continuing to build and collate my portfolio ready for hand in ♥

More in a few weeks once I’ve made a good start on the next project!


References 

China Discovery (n.d.). Yuyuan Garden: ‘Dragon Crossing the Clouds’ [photograph]. Available at: https://www.chinadiscovery.com/shanghai/yu-garden.html [Accessed 12 Apr 2019].

Collingwood, C. (2019). Chinese Dragon Risograph Print [risograph print].

Collingwood, C. (2019). Japanese Koi Risograph Print [risograph print].

Collingwood, C. (2019). Risograph Embellishment: Gold Leaf Test [risograph print, gold and silver leaf].

Collingwood, C. (2019). Risograph Embellishment: Metallic Ink Test [risograph print, metallic inks].

Collingwood, C. (2019). Risograph Embellishment: Metallic Pen Test [risograph print, metallic pen].

inspiration

An Ode to the iPad Pro – An Artist’s Review

Good morning! ❀

I previously made a post talking about my favourite art materials as an illustrator, but there’s one piece of equipment that has really transformed my practice and stood out amongst the others.


Screen Shot 2019-02-04 at 16.57.43
iPad Pro 10.5in, Rose Gold (Collingwood, 2019)


Digital art is on the rise and it’s still a subject of controversy about whether it’s replacing traditional technique too much, but this is my honest unbiased review of something that I want to use in conjunction with my traditional methods of working. I’m by no means a tech expert so this won’t get too far into the specifics- this is more of an overview of the iPad when used for creative purposes.

Making artwork on my iPad Pro has been a pretty big turning point in my illustrations so far- I used to loathe digital work because using my Wacom Intuos tablet was so fiddly and unnatural, but getting the iPad Pro has made it so much more intuitive and wholesome feeling~

First of all, some specs of my own iPad Pro and Apple Pencil:

iPad Pro

  • 2nd Gen WiFi, 64GB (2017)
  • 10.5-inch screen (measured diagonally)
  • LED Retina Display with TrueTone
  • Lightning Port/Headphone Jack
  • £619 via Apple

Apple Pencil

  • Bluetooth connectivity
  • Magnetic ‘cap’ with Lightning Charger (can charge using iPad)
  • Replaceable nib
  • 17.5cm length/21g weight
  • £89 via Apple


Put simply, the iPad Pro is brilliant for making artwork- I find the 10.5 inch more than large enough to support all of my ideas, with ample storage space for files that will grow in size as I continue to work on them. The display is stunning, with TrueTone technology that allows the colours on screen to adapt based on your surrounding lighting.

The iPad Pro is light enough to carry around on a daily basis, weighing in at only 469g for the 10.5in Wifi version. Add a nice case (mine also houses the Apple Pencil alongside the tablet), and you’re looking at around 600g… much lighter than most laptops and traditional art setups! I love taking mine travelling with me to record what I discover.

Now, there is one major sticking point with the iPad Pro, and that is that it does *not* support Photoshop, Illustrator or any of the other full Adobe CC software packages. I debated for a long while whether to purchase one because of this, but after some feedback about it from an illustrator friend, I found Procreate to be more than worthy enough to stand in for Photoshop- it even has .psd compatibility, which makes transferring files between programs a total breeze. And at a one-off payment of £12.99, it’s very budget friendly (which you might need to consider after dropping £700+ on this Pencil/iPad package!)

Working digitally has really allowed me to improve on my proportions and layouts (although there’s still a long way to go!), as well as making me less fearful to make bold strokes and quick mark making in the initial stages of a sketch- I was always a bit hesitant to do this traditionally as too many erased errors can really drag down the finished appearance of a piece. It’s also amazing to have loads of brush styles at your fingertips (literally)- this makes the iPad the best portable device for creating on the go c:


Screen Shot 2019-02-04 at 16.58.00
iPad Pro and Apple Pencil Stylus (Collingwood, 2019)


I also wholly recommend the Apple Pencil- it’s nice and sturdy feeling with a good weight to it, and also works seamlessly with programs such as ProCreate (Savage Interactive Ltd, 2019) and the Adobe collection of iPad software (Adobe, 2019). There’s tilt dynamics for brushes, as well as lots of different points of pressure that really enhance the natural feeling when using this stylus. The pencil tips last a long time (much longer than Wacom nibs!) and are cheap-ish to replace considering their longevity- a 4 pack of nibs are £19 from Apple (Apple, 2015).

Since I bought mine in Summer 2018 there is of course a new version out already, complete with a snazzier Apple Pencil companion that boasts gesture controls and wireless charging capabilities. I’m still really happy with my iPad Pro (2nd Gen, 10.5in) and Apple Pencil- technology is so ridiculous now it just makes you wonder what sort of upgrade will come next~

Thanks for reading my wee review! I’m so grateful to have my iPad and Pencil, and I hope more artists discover how great the combo can be for both quick sketches and fully realised detailed artwork ♥


References

Adobe (2019). Adobe Creative Cloud Mobile Apps. [Software]. Available at: https://www.adobe.com/uk/creativecloud/catalog/mobile.html  [Accessed 26 Jan 2019].

Apple. (2015). Apple Pencil 1st Generation [Product]. Available at: https://www.apple.com/uk/shop/product/MK0C2ZM/A/apple-pencil  [Accessed 26 Jan 2019].

Apple. (2015). Apple Pencil Tips- 4 Pack [Product]. Available at: https://www.apple.com/uk/shop/product/MLUN2ZM/A/apple-pencil-tips-4-pack  [Accessed 26 Jan 2019].

Apple. (2017). iPad Pro 10.5 inch/2nd Generation/64GB/Rose Gold [Product]. Available at: https://www.apple.com/uk/shop/buy-ipad/ipad-pro-10-5/rose-gold-64gb-wifi  [Accessed 26 Jan 2019].

Collingwood, C. (2019). Apple iPad Pro 10.5 Inch, Rose Gold and Folio Case [Photograph].

Collingwood C, (2019). iPad Pro and Apple Pencil Stylus [Photograph].

Savage Interactive Ltd. (2019). Procreate [Software]. Available at: https://procreate.art  [Accessed 26 Jan 2019].


portfolio, SWOT/Target Setting

Concept Development – Character Designs

I have some new character designs to share! c: I’ve been working constantly on these since my last update- I feel I’ve made good progress even though there’s still so much to do!

screen shot 2019-01-28 at 10.19.12
Young Female Character: Initial Concepts (Collingwood, 2019). 
screen shot 2019-01-28 at 10.19.32
Young Female Character: Face Revisals/Development (Collingwood, 2019). 
screen shot 2019-01-28 at 10.22.48
Young Female Character: Palette/Colour Application Experimentation (Collingwood, 2019). 


Meet our heroine of the story- she doesn’t have a name on purpose, because I want the audience to be able to relate to her and put themselves in her shoes. Since she’s youthful, naïve and curious, I wanted these traits to shine through in her character design. I went through loads of concepts (some of which were really awful, haha) but settled on a final design for her that best described her personality to the viewer. I’m sure it shows, but I was really inspired by the ‘chibi’ characters of Studio Ghibli, as well as the loose, simplistic art style of Heikala (info on both of these here from my artist research for this project).

I’m pleased with her design- she went through quite a few refinements as I progressed through my workflow! Final character board below:

screen shot 2019-01-25 at 13.41.43
Young Female Character: Final Character Board (Collingwood, 2019). 


To be honest my favourite aspect of her is her ‘paper bag’ trousers- I didn’t want to put her in a skirt lest that undermine her childish adventurous nature, so I decided to go with these oversized paper bag pantaloons (which also matched her boots and cape much better… too many ‘loose hems’ otherwise!)

I really love them ^^”


Next up, we have our anthropomorphic deer character:

screen shot 2019-01-28 at 10.20.51
Anthropomorphic Deer: Initial Head Concepts (Collingwood, 2019). 
screen shot 2019-01-28 at 10.21.32
Anthropomorphic Deer: Anatomy/Front View Development (Collingwood, 2019). 
screen shot 2019-01-28 at 10.16.14
Anthropomorphic Deer: Palette/Colour Application Experimentation (Collingwood, 2019). 


I designed him to both contrast and complement the young girl character, since the contrast of their environments and designs is central to the narrative journey. The palette is still natural while being different to the bright, fresh toned greens I used on the female character’s designs.

He’s very scholarly and loves a good cup of tea, I hope you can tell~

screen shot 2019-01-25 at 13.41.58
Anthropomorphic Deer: Final Character Board (Collingwood, 2019). 


It was a real challenge to simplify the characters enough so that there wouldn’t be any issues when drawing them repeatedly for the animation- I think I’ve nailed this down enough, but as always there’s always the chance I’ll refine these some more in the follow-up Semester 2 project.

I’m pleased with the outcomes- targets for the next few weeks include finalising and collating all of my projects for hand in, and starting to think about the beginning of Semester 2 and how I’m going to tackle the next few months. Using my previous SWOT analysis’ will help me circumvent any problems I anticipate I’ll have, while also playing towards my strengths to produce a strong semester of portfolio work.


References

Collingwood, C. (2019). Anthropomorphic Deer: Anatomy/Front View Development [Digital].

Collingwood, C. (2019). Anthropomorphic Deer: Final Character Board [Digital].

Collingwood, C. (2019). Anthropomorphic Deer: Initial Head Concepts [Digital].

Collingwood, C. (2019). Anthropomorphic Deer: Palette/Colour Application Experimentation [Digital].

Collingwood, C. (2019). Young Female Character: Face Revisals/Development [Digital].

Collingwood, C. (2019). Young Female Character: Final Character Board [Digital].

Collingwood, C. (2019). Young Female Character: Initial Concepts [Digital].

Collingwood, C. (2019). Young Female Character: Palette/Colour Application Experimentation [Digital].

Heikala (n.d.). Instagram – @heikala (online). Available at: https://www.instagram.com/heikala/?hl=en [Accessed 2 Jan 2019].


evaluation, portfolio

A Short Timeline of The ‘Wonder’ Project

Well I’ve been productive this week…~

(haha but no really, I essentially just finished the Wonder Penguin Project in 4 days). It was intense, but it worked!

I didn’t mean to take such a small amount of time for this (my initial timetable gave me 4 *weeks* from mind map to final cover), but having so much downtime in my life made me reevaluate how long I really had to complete this brief. I have so much in store for PP2 that I didn’t want to waste any more time than necessary on what was supposed to be my ‘shortest’ project- that thought took on a while new meaning…

I had already researched into some existing source material e.g. book covers and film posters before the Christmas break, so I’d be lying if I said I didn’t have a rough idea of what I wanted to do. With this research in hand, I started to draft out some concepts of the cover, evaluating each one and choosing the most successful to take forward to development. This was all pretty run of the mill development work that I completed over the course of a day, so I’ll move onto the more interesting stuff~

I worked in Procreate again to bring the final product to life- I feel that my workflow has really come into its own since I started using my iPad as a key tool in my process; it’s the perfect balance between familiar traditional technique and the ease and innovation of digital painting. I was able to scan in my final concept from my sketchbook and work directly on top of this in Procreate, where I could fine-tune the details, proportions, etc.

Procreate tells me I clocked in at just under 8 hours with over 7000 strokes to complete the cover- that’s quite an interesting stat! I’m pleased with the final image:

screen shot 2019-01-25 at 12.31.31
Wonder Final Cover Art (Collingwood, 2019).

I’ll be making a mock-up final product by laminating my printed cover onto an existing copy of the book before hand in too… it’ll be nice to see a ‘finished product’!

I’m expecting to have to make a few wee changes/additions to the project work (particularly the written work) once I have a pre-hand in tutorial, but for the most part I can put this project to rest. ♥


More next week as the deadline draws near!


References

Collingwood, C. (2019). Wonder Final Cover Art [Digital].

evaluation

Risograph Printing / Weekly Reflection 3.12.18

After a myriad of issues that got in the way of this project, I was finally able to print some risograph images today~

First, I’ll recap the prepping process for the imagery:

Once I had the line art drawn out (done on Procreate, which I’m slowly getting the hang of), I began to apply colour on separate layers underneath the line art. I chose to work with pink and blue inks, as these were two of the 4 colours available at the time. I’m not entirely sure about this colour scheme (it’s a bit out of my comfort zone), but I persevered nonetheless since nothing is set in stone colour-wise with the riso. Having said that, this project is all about experimentation so I’m consciously trying to work with colour schemes I haven’t used yet.

I’ll admit- I’m not used to working in this way, so the way in which I’d ‘blindly’ applied colour was painfully obvious on screen once I’d altered the layer opacities (see below for each separate layer). This will be something to remember in future if I re-do the colour (which I might actually end up doing, since we’ll be getting some more ink colours soon).

Screen Shot 2018-11-30 at 11.16.13
Left to right: Blue layer, Black layer, Pink layer for Risograph printing. (Collingwood, 2018).

It’s also worth noting that no ink layer should be above 75% opacity, in order to avoid smudging and paper jams in the riso. My final layer opacities ranged from 20% (the ‘back’ of the terrarium frames) to 75% (the main black line art), with the coloured layers at 30-50% and 60% in between. By exporting each layer as a separate file, I was able to layer colours when printing (since the ink is semi-transparent), making a mid-purple tone where the inks crossed over.

I’ve gone into much further detail about the print process in my development file, but here’s a pic of the final prints:

IMG_8014.jpg
Terrariums Final Print (Collingwood, 2018).

I was actually really pleasantly surprised at how nicely the image printed- although the registration isn’t perfect (which is a common trait of riso printing), the layers blended well and weren’t as messy looking as they appeared on screen.

At this point, I didn’t love my colour palette but I didn’t hate it, either- I’m most likely going to do another run next week, with neater colour layers and a more considered colour palette. Having green ink available will be really helpful!

…But at the same time, I don’t want this project to drag on for too long, since I want to really focus on the Animation Development brief I’m doing (this is especially important, as it will directly influence the Animation project in Semester 2… if the Semester 1 portion isn’t successful, I won’t have a solid foundation to work on!)

Also still to print is the mini A4 photography based geode flash sheet I’m doing as a side project ♥


References

Collingwood, C. (2018). Risograph Digital Ink Layers: Blue, Black, Pink [Digital].

Collingwood, C. (2018). Terrariums [Risograph print].

about

Creative Practice: Input and Output

As part of my ongoing effort to summarise my illustrative style, process and voice, I’ve created a little infographic about what goes into my creative workflow, and what comes out as a result- put simply, the ‘input and output’ of my process.

We were challenged to develop an infographic with a central theme that mirrors the information- I see my workflow as a growth process, so I chose a very organic looking theme for my image~ I see my workflow as an ‘ebb and flow’ type of process, in the same way that water ebbs and flows with the current. Check it out here, or under the menu bar: Info > Input and Output c:

inspiration

3 Ways to Enhance Your Artwork

When exhibiting artwork (especially when the art is for sale), it’s important to consider new and interesting ways to add interest in order to capture the viewer’s attention, possibly increasing sales in an exceedingly competitive sector of the creative industry.

Of course, this isn’t from a purely business point of view, as the result must also compliment the artwork and be aesthetically pleasing. I love to add things on top of artwork, particularly runs of prints, as it adds a handmade touch that makes each piece unique.

Here are my 3 favourite ways to do this~

1- Surface Embellishment

I’m a big fan of glittery things- anything that sparkles or shifts in the light is sure to catch the eye of a bypasser, whether they like it or not! If the imagery is suited to it, adding a little bit of glitter or other embellishment can really make the difference between run of the mill art, and something people will buy.

I bought a piece from one of my favourite artists (@m_atelier on Instagram, more info in my references), and she jazzed up the art with tiny star shaped sequins before mailing it to me. As it fit well with the other imagery in the work, it looked lovely and created a sense of personalisation and preciousness.

Another example of surface embellishment is using patterned paper or washi tape- @shardula uses this technique quite often, with gorgeous results that add detail and intricacy to the artwork. I suppose I use this technique myself in some of my artwork- I like to digitally overlay patterns as a replacement for colour (see the Artwork tab for examples of this), which is a similar process.

Screen Shot 2018-12-06 at 21.51.06.png
Left: Lopez (2017). Right: Licudine (2018). 

2- Metallic Overlays

This form of embellishment can come from specially made inks or pens, as well as gold leaf or gold foils- each of these methods is best suited to different applications, so it’s up to you to find out which is best for your artwork. Foils can be added to fabric, which can add ‘a little something extra’ to screen printed tote bags or t-shirts, or they can be applied on top of prints using heat or screen-printed glue.

In terms of physical printed or traditional artwork, I find it best to use either pre-filled ink pens (my favourite is the Sakura Touch-Pen Fine, available here in all sorts of finishes), or nib-pens/fine brushes with inks such as the Winsor and Newton metallic calligraphy inks (link here), which are slightly more opaque and concentrated (but are a little harder to get the hang of).

Use metallic embellishment to add highlights or extra detail to the art- again, some of my favourite examples are from artists such as Sibylline Meynet (@sibylline_m) and Feefal (@feefal), shown below:

Screen Shot 2018-12-06 at 22.24.15.png
Left: Feefal (2018). Right: Meynet (2016). 

3- Proper Packaging

If the art is hand-pulled and won’t be produced again in the same format, you can market the pieces as a ‘limited run’ by numbering and signing them individually on the border of the art. Doing this adds value to the work, as numbered editions are considered the highest quality pieces from a run of prints (e.g. risograph, screen print, etc).

If art is being offered for sale, the general consensus is to sign numbered editions in the border of the art, and printed/mass produced prints inside the actual artwork (e.g. in the bottom corner of the piece, as long as it does not detract from the overall image). Always use pencil when numbering/signing artwork in the border, as this cannot be reproduced by printing!

By investing in some fitted cellophane bags, you can protect artwork from fingerprints or creases when selling, as well as add to the value. Mounting the artwork can also add to the overall appeal, as presentation of artwork is important when vying against competing illustrators. Additionally, including a business card with each print, or making a special branded stamp or sticker to seal the packet can add a sense of professionalism.


All of these techniques can help set your art apart from the rest aesthetically, as well as increasing value which in turn will allow you to make a little bit more profit on a piece.

I hope this was slightly helpful… of course the quality of the artwork is second to none when it comes to a successful illustrator, so consider this above all else ♥


References

Cass Art (n.d.). Winsor and Newton Ink [online]. Available at: https://www.cassart.co.uk/drawing/calligraphy/calligraphy_ink/winsor_newton_ink.htm?productid=1609&utm_source=google&utm_medium=base&gclid=EAIaIQobChMIlPOX15qM3wIVCEPTCh2__AkXEAQYAyABEgKbQPD_BwE [Accessed 3 Dec 2018].

Cult Pens (n.d.). Sakura Pen-Touch Fine. [online]. Available at: https://www.cultpens.com/i/q/SK21037/sakura-pen-touch-fine?gclid=EAIaIQobChMIoavCs5mM3wIVQeJ3Ch3cEgMdEAQYASABEgLa4fD_BwE [Accessed 3 Dec 2018].

Feefal. (n.d.). Instagram – @feefal [online]. Available at: https://www.instagram.com/feefal/ [Accessed 3 Dec 2018].

Feefal (2018). Untitled [Ink].

Licudine, M. (n.d.). Instagram – @shardula [online]. Available at: https://www.instagram.com/shardula/ [Accessed 3 Dec 2018].

Licudine, M. (2018). Golden [Mixed media].

Lopez, M. (n.d.) Instagram – @m_atelier [online]. Available at: https://www.instagram.com/m_atelier/ [Accessed 3 Dec 2018].

Lopez, M. (2017). Pavonis [Watercolour, ink].

Meynet, S. (n.d.). Instagram – @sibylline_m [online]. Available at: https://www.instagram.com/sibylline_m/ [Accessed 3 Dec 2018].

Meynet, S (2016). Mermay 2016 [Ink].


research

Risograph Research

It’s now the third week of my timetabled period in which I’m meant to be working on the Printmaking project; while the work I’ve produced in the past 2 weeks isn’t completely irrelevant, it’s high time I started getting deeper into the risograph side of things, e.g. how it works, the process and how to create artwork suitable for the riso.

Dare I say… from the research I’ve done so far, it actually sounds easier than I’d initially anticipated. An actual miracle.

From what I’ve gathered, risograph printing is essentially a cross between screen printing and photocopying, but more environmentally friendly and with a more limited colour range (MUCH more on this in my project research- I’m just doing a quick recap).

Having said that, it’s still quite technical and very different from the processes I’m used to working with. For example, you have to keep in mind the bleed areas around the design, the potential for accidental overlap, and the possibility of errors due to the machine, e.g. roller marks. However, through careful planning I’m certain a lot of these areas of concern can be sidestepped- respectively, this could be through careful border layout, trapping line and colour, and laying out heavily inked areas accordingly. (HatoPress.net, n.d.).

It’s quite a lot to keep in mind, but doing an ample amount of research prior to designing imagery has given me a really good basis of knowledge on which to build the project. My initial mind map helps me to plan out the work I need to do as the project progresses:

IMG_7945.jpg
Initial Mind Map- I find these useful at the start of every project. (Collingwood, 2018.)

Pending the success of this introductory project, I could utilise this technique to make zines, posters, business cards etc for final show- the colour palette might be more limited, but it’s infinitely less laborious than screen printing (and most of the other traditional printing processes, for that matter)~


References

Collingwood, C. (2018). Personal Project 1 – Initial Mind Map.

HatoPress.net. (n.d.). Printing – Risograph. [online] Available at: https://hatopress.net/printing/#guide-item-1 [Accessed 22 Oct. 2018].